Category: Photo Booths

Fun Story, Photo Booths

The Duke, Our Wild West Photo Booth

8 April 2020
Wild West Stagecoach Photo Booth

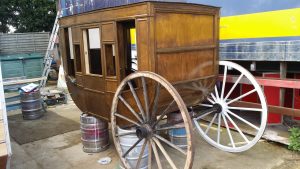
We have a number of specialised photo booths, London taxi cabs, a classic Mini Cooper, Indian Tuk Tuk. Well now we have a wild west photo booth

When looking for new lines we hit upon the idea of a Wild West photo booth. We looked at various saloon bars, a teepee, but decided that the most classic wild west ‘vehicle’ had to be the Concord stagecoach. Just like John Wayne in the classic film.

Luckily, we have a member of staff that happens to be a whizz, with wood. So, after some research, and finding some stagecoach plans (albeit for a model coach), we managed to create a workable blueprint.

The Build

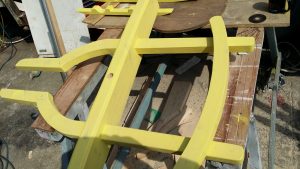
When we started, in fairness, we didn’t actually realise the amount of work we were letting ourselves in for. But the initial body shaping looked spot on, and kept us reassured we were on the right track.

Initial Frame Build
Outer Panelling
Starting To Take Shape

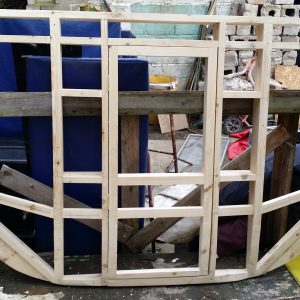
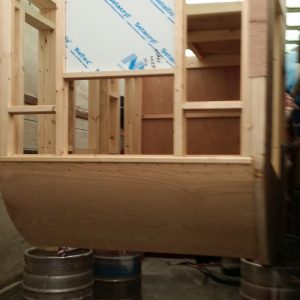
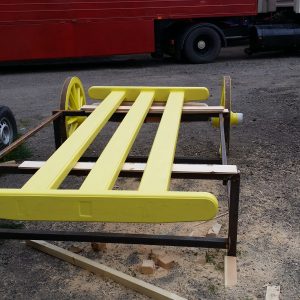
The initial body shape came together well, because the body curves in 2 planes, it was difficult to shape, but after some intensive work, we got it together into the basic body.

Adding The Detail to the Doors and windows.
Coat Of Stain, And Trying The Wheels For Size
Drivers seat and footboard added
Adding The Drivers Seat And Footboard

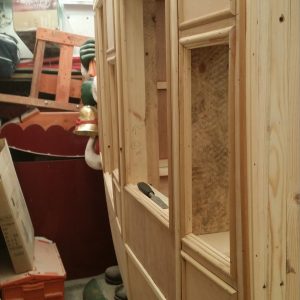
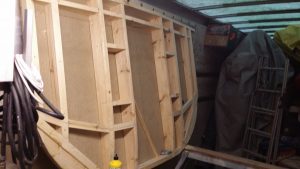
This about finished the body, other than the interior. We didi think that was the bulk of the work done, until we actually started assembling the chassis.

Fitting The Chassis Joints
Getting There
Assembling The Front Axle
Assembled, Now Adding Some Of The Metalwork

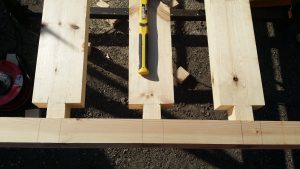
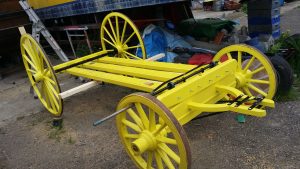
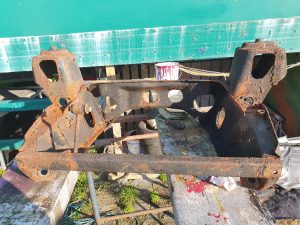
The Chassis was actually quite complicated, as we tried to follow the real things metalwork, with a working handbrake, and the correct slings and fittings.

Almost The Finished Item. Body Mounted, Much Of The Steel Work Fitted.
Adding The Artwork To Finish It Off
Our High Plains Buffalo

All in all it was a long complicated build, but it has given us a totally unique photo booth, perfect for those wild west events.

Photo Booths

Our Black Cab Photo Booth At Joe Macaris

15 February 2020

We recently provided a classic black cab photo booth for a birthday party. At the Joe Macari car dealership in London.

Now this isn’t just any old dealership. A quick look at his stock inventory will show a who’s who of classic high end cars. Lamborghini Countach, Jaguar E Type, Ferrari California, the list just goes on.

Really its like a petrol heads dream. He even has some quirky items like the Lamborghini LM002 SUV, of which only about 328 were ever produced. Or how about a Lambo tractor.

Classic Black Cab Photo Booth

We installed a black cab photo booth. After setting it all up, the boss told his car detailer to polish it up. He started and laughed to me that he had cleaned some of the worlds most exclusive cars, but that was his first ever London taxi.

Our Classic Black Cab Photo Booth

Whilst on this job, a stunningly attractive Indian lady came up, accompanied by what looked like a throwback to a 1960’s groupie. Slicked back hair and the works. She looked at me and exclaimed, “Do you know what he did last week?”,

“No Idea” I Said,

“He took a porn star to a red carpet event!”

Laughing he said yes, she was off fake taxi dot com. His companion inquired as to what that might be, to be told that its a porn site. Where a taxi cab exactly like ours drives around London picking up beautiful women. Who just happen to want the driver to climb in the back with them and, well you can figure out the rest.

“Yes”, I said to break the tension, “I have been driving around all day and not been stopped once!”.

“Thats OK mate he replied, I will give you the number for my friend”

Lol, before I could comment his companion, replied “I can do better than that, I will give him my number and he can come and pick me up.”

Funny thing was he didn’t seem to be too impressed by that. As I walked away for a drink they were just firing the starting salvos of what promised to be an acrimonious argument.

Photo Booths

Restoring Our Mini, Some Of The Little Bits

11 February 2020

Restoring our Mini is continuing. Most of the larger parts are with various experts to be sorted out. Meanwhile we have been tidying up some of the smaller pieces, which are necessary to put the icing on the cake and make our Mini something special.

Steering Column

The original column was a bit tatty, plus the steering boss was falling apart, and the steering wheel had seen better days.

We stripped the column down, shot blasted it then zinc galved and coated it with black anti rust topcoat.

The plastic column was replaced entirely as the old one had been drilled a number of times to insert screws to hold the broken indicator stalk.

Our Old Column A Bit Worse For Wear

The original boss was broken, well the plastic surround. We had intended upgrading the steering wheel to a Momo version, so needed a new boss as the hole pattern was different.

Our New Momo Steering Wheel, complete with uprated racing quality boss.

Whilst we were on the renewal war path, we also added some nifty billet alloy indicator stalk ends. These are made by a classic mini owner in limited quantities and really add a touch of class.

Our Nifty Billet Alloy Stalk Ends

Finishing the steering column off was a new column drop bracket. This came from the range created by DSN retrosport. The quality as always is absolutely fabulous.

DSN Retrosport Steering Column Drop Bracket

Finishing our days work off, we managed to get the fuel tank coated with an anti rust top coat. Restoring our mini, has admittedly become a bigger job than we realised, but we are three parts through it now.

Classic Mini Fuel Tank
Fun Story, Photo Booths

Classic Mini Restoration

30 January 2020

Continuing our restoration we have just finished the front subframe. That’s the classic Mini version of a chassis, they have one front and one back. The front one here carries the engine, front braking system and front wheels.

This one was a bit worse for wear than the rear frame. Necessitating replacing the entire metal structure with a new one. We took the opportunity whilst doing this to replace and upgrade the braking system, drive hubs and brake pipes.

Classic Mini Front Subframe

We replaced the entire front subframe to give us a firm base to start from.

Badly Rusted Towers
More Rust

We also made the decision to go back to solid mounts on the front subframe and semi solid on the tower mounts. Although it is meant to slightly worsen the ride quality, it is supposed to vastly improve the handling, and lets face it, the best part of a classic Mini is the ability to throw it around corners, fast.

Our Newly Refurbished Frame

We also decided that we were going to replace the brake discs with some uprated versions. After much research settled on some Red Calipers from KAD. To be honest this was as much for the looks as anything else. They are absolutely stunning in anodized red, we also added vented and grooved discs, and lightweight alloy drive hubs for a little weight saving.

Braking System

KAD Brake Calipers
KAD Brake Calipers rear view

We also added the obligatory Goodridge braided brake pipes. Fully adjustable tie bars and bottom control arms to allow the suspension to be set up to perfection.

Specialist Components LIghtweight Tower Bolts

The late great Colin Chapman once said, give a car more power and its faster on the straights, make a car lighter and its faster everywhere. To this aim, we swapped the tower bolts for lightweight alloy alternatives. Another product from Specialist Components, a little weight saving along with stunning looks.

DSN Retrosport Solid Front Mounts

The other front mounts.
Stainless Top Arm Brackets

Its meant to be a classic mini restoration, but the aim is to use modern components to make it better than original.

Event Planning, Fun Story, Photo Booths

Beginning Jaspers Restoration

22 January 2020

The engine out of our mini is in bits, spread around a number of specialist engine builders (MED and Southam Mini Centre), to be tuned up and the power output cranked up a bit. Although Jaspers restoration was meant to be a quick tidy up, its ended up becoming a complete makeover.

The bodyshell is in the blasters to be stripped of paint. So we have turned our attention to the rear subframe, the first of the parts we are refurbing in house.

It was a bit grotty to start with, but mainly surface rust so nothing to major to put right.

The swing arms were blasted, coated with cold galvanizing spray then topcoated with a Rustbusters product. The bushes and bearings were changed, new pins fitted, Goodrich brake lines, alloy brake drums, and specialist components rear hub assemblies fitted, along with DSN retrosport alloy brake plates.

Things like the handbrake quadrants are really for looks rather than performance, but hey if you are going to do it, might as well look the part.

To finish the subframes we fitted alloy trunnions, adjustable swing arm brackets, and seam sealed the subframe to prevent water ingress. Once the subframes are fitted we have some Bilt Humber anti rust wax, but we don’t want to coat the parts yet as it will make a mess fitting them.